Docker+Uwsgi+Nginx部署Django项目
版本信息:
系统:Centos7
Python:3.6.2
Django:2.2.0
Docker配置
docker安装方法请自行搜索并安装。
创建一个Centos容器,让它在后台运行:
1 | docker run -d --name freestudy --network host centos:7 tail -f /dev/null |
-d:让它在后台运行
–name freestudy:设置名字。
–network host:让它加入宿主机网络,从而可以连上外网
centos:latest:要运行的镜像及其版本
tail -f /dev/null:让容器一直执行某条命令,以免没有任务而自动退出
进入容器:
1 | docker exec -it freestudy bash |
-it:打开该容器的输入(stdin)和终端(tty)。 bash:在容器中执行bash命令,启动一个shell,供用户操作。
退出容器:
1 | Ctrl+D |
Python及插件库环境配置
将Django项目从宿主机拷贝到容器:
1 | docker cp /root/django freestudy:/root/ |
之后便可以在Centos容器里部署Django项目,不满意就销毁重建。
安装Python及pip
进入容器:
安装Python解释器:
1 | yum install epel-release # 添加epel软件库 |
这里默认安装的是3.6.8版本
我想要安装3.6.2,直接用之前传好的文件安装吧
1 | docker cp /tmp/Python-3.6.2.tgz 04c193b9e394:/ |
安装ifconfig
1 | yum install -y net-tools |
安装依赖包
1 | yum install openssl-devel bzip2-devel expat-devel gdbm-devel readline-devel sqlite-devel gcc gcc-c++ openssl-devel libffi-devel python-devel mariadb-devel |
解压安装Python:
1 | tar -xzvf Python-3.6.2.tgz -C /tmp |
安装至/usr/local目录:
1 | cd /tmp/Python-3.6.2/ |
更改/usr/bin/python链接
1 | ln -s /usr/local/bin/python3.6 /usr/bin/python3 |
安装pip:
1 | yum install python36-pip |
cd到项目requirements.txt目录下:
安装依赖库:
1 | pip3.6 install -r requirements.txt |
报错:需要更新pip
1 | pip3 install --upgrade pip |
速度慢,看下上面报错是超时退出了。
遇到pip3 install的速度巨慢时,可以更换源:
1 | [root@localhost ~]# cd |
写入如下内容
1 | [global] |
再次报错:
ERROR: Command errored out with exit status 1: python setup.py egg_info Check the logs for full command output.
升级setuptools:
1 | pip3.6 install --upgrade setuptools |
出现报错:
1 | Collecting django-pure-pagination |
解决:
命令行输入:
1 | export LANG=en_US |
安装Mariadb
安装Mariadb数据库容器
1 | docker pull mariadb |
-d: 表示detach,后台运行并打印container ID;
-p: 端口,3301:3306表示将容器中的3306端口公开给host的3301端口;
-v: 表示volume,用来设置数据文件存放的位置,/root/mdbdata:/var/lib/mysql表示将host中当前用户文件夹”/root/mdbdata”挂载于容器中的/var/lib/mysql目录,这样即使容器被删除,数据文件还是可以保留;
-e: 表示environment,用来设置用户及密码等环境变量,MYSQL_ROOT_PASSWORD=admin表示将root的密码设置为root1234(只在第一次登陆数据库时使用);
–name: 表示容器的名称,例如现在这个数据库容器的名称为mariadb
命令的最后是镜像的名称,mariadb
修改为自启动:
1 | docker container update --restart=always 容器id |
测试登陆:
1 | mysql -uroot -proot1234 -h127.0.0.1 -P 3301 -D mysql |
创建数据库:
1 | CREATE DATABASE freestudy DEFAULT CHARACTER SET utf8 COLLATE utf8_general_ci; |
查询容器数据库ip:
1 | docker inspect --format '{{ .NetworkSettings.IPAddress }}' 容器id |
查看宿主机ip:
1 | ifconfig |
进入应用容器,同样适用ifconfig查看ip
172.17.0.1
进入应用容器,cd到settings.py,vim将mysql连接host修改:
172.17.0.3
测试项目
执行
1 | python3 manage.py makemigrations |
将缺少的库一个个地pip3 install
遇到找不到的库就在名称前面加django-
如:
1 | pip install django-formtools |
(两个容器连接成功)
测试运行:
1 | python3 manage.py runserver 0.0.0.0:80 |
打开一个新对话:
1 | curl 127.0.0.1:80 |
成功访问。
安装uWSGI服务器
安装uWSGI:
1 | pip install uwsgi |
进入django项目目录:
1 | mkdir conf |
输入配置:
1 | # mysite_uwsgi.ini file |
注:
chdir: 表示需要操作的目录,也就是项目的目录
module: wsgi文件的路径
processes: 进程数
virtualenv:虚拟环境的目录
使用配置文件启动uWSGI服务器(默认在后台运行):
1 | uwsgi --ini uwsgi/uwsgi.ini |
显示运行成功了。
测试运行:
1 | uwsgi --http :8000 --module FreeStudy.wsgi |
打开新对话:
1 | curl 127.0.0.1:8000 |
成功获取。
停止uWSGI服务器:
1 | uwsgi --stop uwsgi/uwsgi.pid |
安装Nginx
1 | yum install nginx |
配置:
1 | conf/nginx/uc_nginx.conf |
1 | # the upstream component nginx needs to connect to |
将上述配置文件加入到nginx的启动配置文件中:
1 | ln -s /root/django/FreeStudy/conf/nginx/uc_nginx.conf /etc/nginx/conf.d/ |
拉取所有需要的static file 到同一个目录
在django的setting文件中,添加下面一行内容:
1 | STATIC_ROOT = os.path.join(BASE_DIR, "static/") |
运行命令
1 | python3 manage.py collectstatic |
启动nginx:
1 | /usr/sbin/nginx |
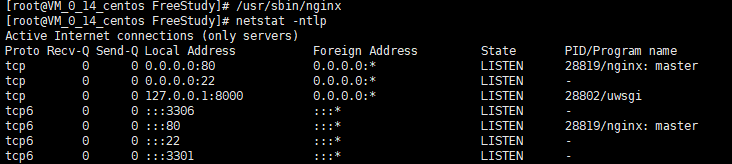
没有报错,查看进程:
1 | netstat -ntlp |
没有看到uwsgi监听的端口
解决Uwsgi没有启动
使用curl 127.0.0.1:8000查看返回:
报错:
curl: (7) Failed connect to 127.0.0.1:8000; Connection refused
uwsgi错误检查:
1 | 查看uwsgi进程运行: |
解决:
1 | 要先运行项目: |
查看进程:
1 | ps -ef|grep uwsgi |
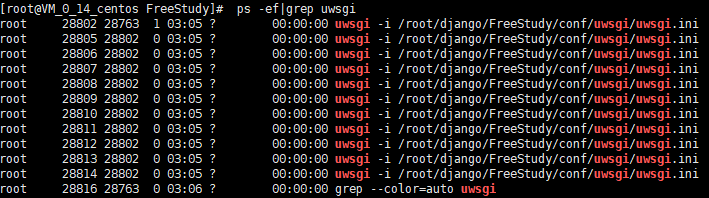
多了很多进程,一开始失败时只有最下面一个。大概率成功运行了。
在kill掉nginx进程的前提下,再次开启nginx
1 | /usr/sbin/nginx |
并检查检查,成功发行uwsgi进程
使用curl ip地址
成功获取页面。
获取静态文件报错
浏览器发现静态文件获取有误,报403错误,图片没有加载出来。
1 | cd /etc/nginx |
成功。
注意:
当使用python3 manage.py createsuperuser等出现报错:
1 | ERRORS: |
设置外网访问服务器数据库:
配置
1 | GRANT ALL PRIVILEGES ON *.* TO 'root'@'%' IDENTIFIED BY '外网访问密码' WITH GRANT OPTION; |
Navicat无法连接
解决:
上面修改了访问限权,容器之间的访问会受影响,需要到项目settings.py
修改数据库连接配置,将连接密码由原来的root1234改为外网连接的密码
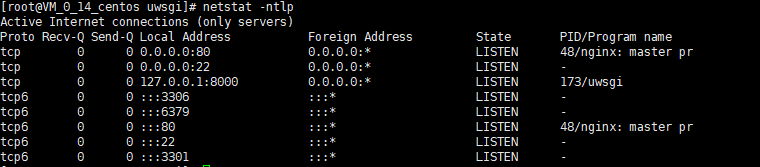
nginx:
1 | netstat -ntlp 查看进程状态 |
进入mariadb容器
1 | apt-get update |


确保已经被注释掉了
创建Mariadb镜像备份:
1 | docker commit -m"mariadb" -a"Such" 容器id mariadb:v1 |
redis容器
实现邮箱验证码功能还要安装redis容器:
拉取镜像:
1 | docker pull redis:latest |
运行容器:
1 | docker run -itd --name redis -p 6379:6379 redis |
邮箱验证码运行成功。
解决拉取pull速度慢:
1 | vim /etc/docker/daemon.json |
自动把后台CSS样式和其他相关文件资源收集到/static/目录下。
1 | 报错: |
域名解析:
添加解析后,将nginx配置文件(uc_nginx.conf)修改,
将ip地址改为你购买的域名地址
vim相关操作:
1 | 输入 i表示插入 |
容器操作:
1 | ctrl+D可退出容器路径 |
制作应用镜像备份:
1 | docker ps |
删除镜像:
1 | docker rmi 镜像id |
更新文件:
1 | 可使用xftp直接修改文件,然后复制到容器实现修改。 |
涉及到数据表的修改要makemigrations与 migrate
然后停止uwsgi(避免占用8000端口),再运行python3 manage.py runserver 0.0.0.0:8000
启动uwsgi
邮箱服务器安全性
之前邮箱服务器使用了账号密码不安全,现改为授权码,同时之前使用的密码登陆服务失效,需要重新部署:
EMAIL_HOST_PASSWORD = ‘授权码’
重新runserver,发现mysql连接报错。
尝试改了host地址,服务器的ip,数据库容器ip地址都不行。。
最后使用数据库容器ip 172.17.0.2,密码是外部连接的密码!连接成功。。稀奇古怪呀!